Instant-Shop enables you to divide your products into Categories and Subcategories, making it easier for your customers to find their way around your web site. It is possible to add up to four levels of Subcategory to each Category and associate a picture and description with each Category and Subcategory.
This page is also part of the setup wizard.
The list of categories will be presented on the first page of the store. There is no limit to the number of categories that you can have. However it is recommended that you have no more than 10 categories otherwise the customer will be inundated with too many options. If no categories are defined then Instant-Shop will automatically put products on the first page of the store.
Editting Categories
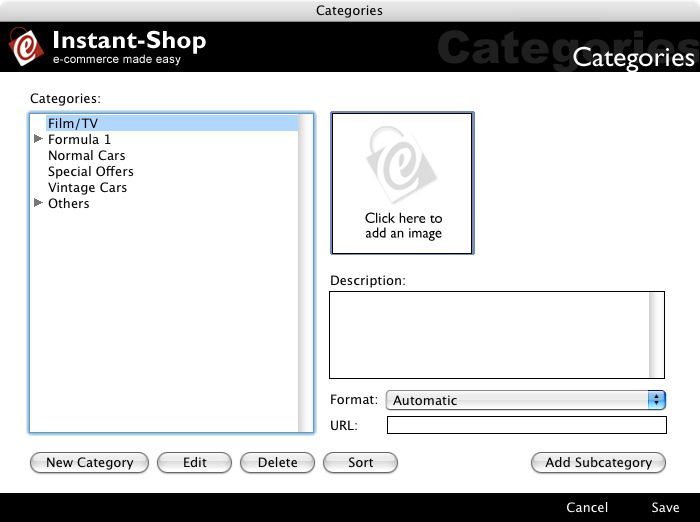
To enter a new Category click 'New Category'.
Enter the new Category Name in the box and click 'OK'. The new category is inserted in the category list
To amend a Category highlight the Category Name and click 'Edit'.
To delete a Category highlight the Category Name and click 'Delete'.
The order of the category list can be changed by dragging and dropping categories around in the category list. Alternatively all the categories can be sorted in to alphabetical order by clicking the 'Sort' button.
Category Pictures
Instant-Shop enables you to associate a Category Picture with each Category. To enter a Category Picture highlight the Category Name, click on the 'Click here to add an image' box and select 'Import Picture' from the'Picture' menu or paste an image from the clipboard. Use the 'Import Picture’ window to select the appropriate image file from its location on your computer.
To remove an image click on the Picture box and select 'Clear Picture' from the 'Picture' menu.
Category Pictures are optional but will make your web site look much better if they are used. If they are not used Instant-Shop will display the names of the categories as a simple list. If they are used then Instant-Shop will display the categories graphically. Instant-Shop will automatically work out how best to display them, by attempting to fit the categories into a square either 4 or 3 wide.
Instant-Shop supports the widely used graphic file formats that end in .jpg, .gif, and .bmp and all Photoshop files. The optimum size for the category picture is 400 x 300 pixels. Instant-Shop will scale larger pictures accordingly.
Category Description
Instant-Shop enables you to associate a Category Description with each Category. The Category Description provides the customer with a brief overview of the range of products they will find within the Category. To enter a Category Description highlight the Category Name and enter a description in the box provided.
Sub-Categories
Sub-Categories allow you to break your product categories down even further. To enter a new Subcategory highlight the Category Name and click on 'Add Subcategory'. Enter a new value in the box provided.
Instant-Shop will automatically format the products pages based on the data being displayed. It is possible to manually define the product layout used within each category by selecting it from the 'Format' menu. To see the types of product layout available click here.
URL
By default Instant-Shop manages its own categories, but it is possible to link a category to point to another page on the Internet simply by entering the URL of the page in the 'URL' field. To have Instant-Shop use the category then the 'URL' field must be blank.
If you are accessing this page as part of the setup wizard the 'Save' and 'Cancel' buttons will be replaced by a 'Next' and 'Back' button. Click 'Next' to go to the next screen in the wizard.
Alternatively click 'Save' to save your changes and close the screen. Click 'Cancel' to close the screen without making changes.
Instant-Shop™ User Manual